Colorspacer
Documentation describing the function of each user interactable tab
Installation
- In your Blender workspace click on edit -> preferences
- Navigate to 'addons'
- On the top right, click 'install'
- Navigate to the Colorspacer.zip file and click install
- Enable the addon by ticking the addon box
Addon menu
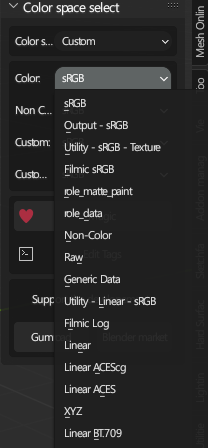
Color space select - The topmost tab lets you select between Blender default and ACES Color space, Depending upon your choice, the specific color space options will change to Default and ACES options
Color, Non-Color, Custom 1, Custom 2 - These options let you set the colorspace you want to the tags set in the preferences, e.g. You have set the tags for base color to be "Albedo base color", and you have set your colorspace for base color to sRGB then if an image in your material contains any of the tag, it will change its colorspace to sRGB
Edit tags : This button will lead you to the addon preference menu
Preferences menu
Tags : Tags are identifiers that are used to detect the image and set the colorspace accordingly, remember that each tag should be lowercase and multiple tags be separated by space(no need to use the comma ',')
Shortcut
Ctrl+Shift+Y will execute the addon function
The shortcut can be managed in the preferences
Using the addon on selected objects and globally
Only selected objects: When you use the addon while something(any object) is selected, it will fix the colorspace for that object/objects
Global fix: Using the addon when nothing is selected will fix the colorspaces globally(for every material)
Changelog
v 2.2 : This version brings QOL updates to the addon
- Added Blender-Agx to color-space options
- The user preferences are now persistent, your color-space choices will now carry on instead of being reset every session
- Added more supported nodes to the node-train engine
Principled Bsdf [Alpha], Displacement, Bump [Normal]
- The Addon will now also show up in the shader editor
Principled Bsdf [Alpha], Displacement, Bump [Normal]
v 2.1 : This version brings a major upgrade to the whole addon
- Updated the Node-train engine to go through the whole node chain of supported nodes
- Supported nodes :
Principled BSDF: Base color, Emission (Color) | Metallic, Roughness, Specular (Non Color)
Normal Map: Color (Non Color)
Bump: Height (Non Color)
Emission: Color (Color)
- Added the support to use the addon only on selected objects for both engines(Select objects of which you want to fix colorspace and use the addon - it will only fix the colorspaces of those objects, not selecting anything and using the addon will fix the colorspaces globally
Principled BSDF: Base color, Emission (Color) | Metallic, Roughness, Specular (Non Color)
Normal Map: Color (Non Color)
Bump: Height (Non Color)
Emission: Color (Color)
v 2.0 : This version brings the long awaited Node based engine to the addon
- Added Node based engine to colorspacer
- This method ignores the names of the images in textures and assigns colorspace based on the input socket that the texture is connected to
- Currently only three nodes are supported:
Principled BSDF, Normal map, Bump
- Sockets :
Principled BSDF: Base color, Emission (Color) | Metallic, Roughness, Specular (Non Color)
Normal Map: Color (Non Color)
Bump: Height (Non Color)
Emission: Color (Color)
Principled BSDF, Normal map, Bump
Principled BSDF: Base color, Emission (Color) | Metallic, Roughness, Specular (Non Color)
Normal Map: Color (Non Color)
Bump: Height (Non Color)
Emission: Color (Color)

v 1.1.0 : This version brings Custom colorspace support to the addon
- Added custom color space menu to the list, expected to support any further misc. use cases
v 1.0.0 : This version brings Agx support to the addon
- Colorspacer now supports Agx

v 0.1.2 : This version brings small quality of life changes to the addon
- An option to change the addon shortcut has been added to the Preferences menu
- Filmic Log has been added in the Color section of 'Default Blender' menu
- The addon will now display "Color spaces fixed" on execution in the info panel


Choose a product version:
| Sales | 90+ |
| Customer Ratings | 4 |
| Average Rating | |
| Dev Fund Contributor | |
| Published | over 1 year ago |
| Blender Version | 2.91, 2.92, 2.93, 3.0, 3.1, 3.2, 3.3, 3.4, 3.5, 3.6, 4.0 |
| License | GPL |
Have questions before purchasing?
Contact the Creator with your questions right now.
Login to Message