Auto Bake: Texture Baker & Exporter

Where is Auto Bake in Blender?
Auto Bake is inside the Properties window, just where the default Bake panel is located.

What can I bake exactly?

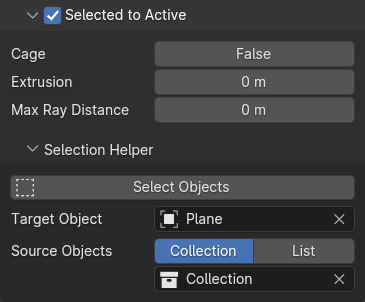
Can I bake high to low poly? (Selected to Active)
Can my object have multiple materials?
Can my materials have node groups?
Yes! Materials can have any amount of node groups. Materials can also have nested node groups, meaning node group inside node groups, and so on.
Can my materials have multiple Principled BSDF nodes?
Definitely! Materials can have any amount of Principled BSDF nodes. Mix or Add them, they will be baked like if you used only one.
Can I bake multiple objects?
Yes, and it's easier you would think! Just select the objects in the viewport and if you already have items in the Bake List you are ready to go! Click on the bake button and wait for the results
Is UDIM / Tiled texture bake supported?
Totally! Auto Bake has a dedicated UDIM bake mode. You can automate everything what normally you would have to do manually. UDIM numbers are supported from 1001 to 2000 tiles, just what Blender allows!
Can I apply anti-aliasing to the textures?
Auto Bake offers two type of scaled-anti-aliasing: upscaled and downscaled.
- Upscaled: Textures will be created and baked at a higher resolution (set in %), and they will be scaled back down to the original texture size.
- Downscaled: After the bake, the textures will be scaled down (to a set %) and then re-scaled to the original size.
Both version can results smoother edges, but to which is the better, that mostly depends on the given case. Upscaled requires more computation resource since the textures are baked and created at a higher scale, while downscaled scales down the textures and can result in some loss of detail, but the rate depends on the size of the texture and the downscale value.
How do I export the textures?
Textures can be exported in two ways. Either instantly as the texture is finished baking, or with the "Export" button, which is available only after all the textures in the queue are baked. Whichever you choose, both will use the set same export settings.
How do I edit the texture's name?
The easiest way to modify the texture's name is to edit the prefix, bridge, and the suffix values. You can find these inside the Image > Name panel section.
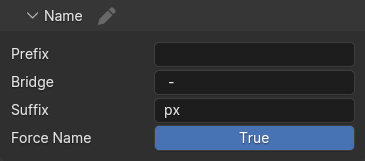
If it's not enough the whole name structure can also be modified which is used to generate every texture's name. This panel can be opened with the pencil icon next to the panel name "Name".
The name structure editor holds the items that can be used to generate the texture's name. These items are called "structure elements" and can be seen between braces {}. Other than these, simple text can also be inserted in the structure, like the "x" at the end of the "UDIM Name Structure".


How to install the addon?
To install the addon, you need to have the addon's zip file downloaded. If you don't have it and need help please check out the article below, it will guide you through the steps.
Article: How to Find and Download Your Purchases
-
After successfully downloading the 'auto_bake.zip' file, open Blender and navigate to the Preferences window. Click on 'Edit' in the top-left corner, then select 'Preferences'

-
In the preferences window, select the "Add-ons" panel on the left, then click on ‘Install’ in the top left corner.

-
Locate and select the downloaded ‘auto_bake.zip’ file in your folder and then click on the ‘Install Add-on’ button in the bottom-right corner.

-
The final step is to make sure the ‘Auto Bake’ addon is enabled in the Preferences window. If not, click on the checkbox to enable it.

After the installation you will find the addon inside the Render Properties, just where you would normally bake.


You can contact me two different ways. You either contact me directly through Blender Market or join to the discord server and open a ticket.
If you want to contact me on Blender Market, click on the "Ask a Question" button on the product page. If you can't find it check out this article.
If you want to contact me through discord, join the discord server, where you can open a ticket.
Choose from three ticket categories:

Bug: Report any issue with the addon
Feature Request: Tell me what would you like see being added next
Question: Ask the questions that you couldn't find the answer to
After you chose the ticket type you will be assigned to a new text channel ("ticket-38" in this case) where you can address your report.

Choose a product version:
| Sales | 70+ |
| Dev Fund Contributor | |
| Published | about 1 month ago |
| Blender Version | 4.1, 4.0, 3.6, 3.5, 3.4, 3.3 |
| License | GPL |
Have questions before purchasing?
Contact the Creator with your questions right now.
Login to Message