Vortex - Fluid Enhancements
- Installation and Vortex Manager setup
-
Vortex Flow
- Using a Mantaflow (default) simulation
- Using a FLIP fluids simulation
- Using a custom flow map
- Using a constant flow speed
- Parameters
- Vortex Water Parameters
- Vortex Foam Parameters
- Reusing the internal flow mapping node
1. Installation and Vortex Manager setup
First download the included .zip file wherever you choose. Then choose Edit > Preferences > Add-ons > Install, select the file and make sure to enable the addon with the checkbox. You should now see this panel in the material properties tab, use it on the fluid object and adjust settings if you need to. Hover over the settings to see tooltips explaining them.

The generated material can be used as-is, but you might want to finetune some settings, see the documentation below for the individual parameters. There is also a tutorial, walking through an example project. That tutorial doesn't use Vortex Manager yet, so large parts of it (node group appending and initial shader setup) can be ignored.
2. Vortex Flow
2.1 Using a Mantaflow (default) simulation
Use the Texture > Point Density node and copy the the parameters as follows:

Object: The name of the fluid object, here called "Domain",you might have chosen a different name.
Particle System: The fluid particles, created by blender automatically and called "Liquid" by default.
Space: World Space
Interpolation: Cubic
Color Source: Particle Velocity
Radius: radius can vary a lot depending on the scale of your scene and simulation settings. The easiest way to finetune it is by previewing the Color output (using an emission shader).
Setting it higher smooths the flow, but too high and you lose detail and performance is impacted massively.
Setting it too low can cause artifacts. Watch for pixelated back spots.
See the example below, note that it is supposed to look somewhat blurry.
2.2 Using a FLIP fluids simulation
Requires Blender 2.93+.
First make sure that in the FLIP Fluids Surface settings, Generate Velocity Vectors is enabled when baking. Use an Attribute node with "flip_velocity" and connect the Vector output to Particle Velocity. Set Particle Density to any number that's (significantly) larger than zero. Note that with this setup, Flow Distance is usually a lot smaller compared to a similar one for Mantaflow.

2.3 Using a flow map with Vortex Flow
Using a custom flow map as input for Vortex Flow is straightforward. Connect your texture's color to Particle Velocity (assuming that you have made sure that it uses the correct UV map). Set Particle Density to a high number (i.e. 10.0), or the flow map will be overridden.
2.4 Using a constant flow with Vortex Flow
Note: If the flow direction is horizontal, you can also use the wind parameters.
Enter the Particle Velocity directly as a vector (x, y and z amounts). And like above, Set Particle Density to a high number. You might have to experiment with different values to get the direction you want.

2.5 Parameters
Particle Velocity
The velocity used for computations by the Vortex Flow method. Source does not necessarily have to be particles (see 2.2/2.3). Relative to world space, so the flow direction is not influenced by object rotation.
Particle Density
Used to weigh the influence of Particle Velocity, as areas with low particle density can have inconsistent particle velocities. Set to a high value if not using a simulation as source. (related: see Density Blending below)
Time
Animate this value. The easiest way is to write "#frame" as the value, this uses the frame number.
Time Scale
A multiplier for the time value. Determines the speed of both flow and wind. If frame numbers are used for time, it should be very small, values will then be near the range of 0.01 and 0.2.
Flow Distance
The maximum distance that a wave can visually travel along the flow, determines the amount of distortion in the output. Unit is arbitrary and can range from 0.1 to 100 depending on the context.
Wave Animation Speed
Not the speed at which waves move with the flow, but the speed of the constant animation of waves. This value makes sure that waves vary over time even when there is no flow or wind. Similar to time scale, it should be a small value if Time is set as frame number.
Wave Scale
Set the scale of the noise texture that determines how waves are created.
Wave Detail
Set the detail of the noise texture that determines how waves are created.
Wave Roughness
Set the roughness of the noise texture that determines how waves are created.
Wind Angle
Angle between 0-360 degrees for the direction that wind is moving in. Only has an effect if wind speed or wind stretching is non-zero.
Wind speed
The amount of velocity in the direction of Wind Angle, the resulting velocity is combined with the input of Particle Velocity and is affected by time scale.
Wind stretching
Stretches waves perpendicular to the wind direction. This happens in real life when the wind is noticeably stronger than other reasons for water flow. So for instance standing water with wind blowing over it, or strong winds over the sea.
Density Blending
Related to Particle Density, it scales the effect where regions with low particle density (particles are usually only near the surface) ignore the particle velocity. Increasing this ensures a smoother transition from areas with high density to areas with low density. The exact amount depends on many different settings in your scene, tweak it so that the transition looks smooth but the surface still shows properly flowing waves.
3. Vortex Water
Vortex water is a shader that can be used independently of the other nodes in Vortex. It is used the same way as most shaders, with the addition that it has both a surface and volume output, these can be connected directly to the material output.
 Suspension Color
Most of the surface color is determined by the reflections of surroundings, this is value only determines the color of particles suspended in the fluid. This will most likely be yellow or brown for murky waters. Other fluids can have varying colours, fruit juice could for instance have a red suspension.
Density
The density of the suspension, or the murkiness of the water. The best value can be very large or very small depending on the scale of your scene.
Scatter
How much light is scattered back out of the surface (no effect if density is zero). Lower values make more light "disappear" and result in a darker surface. Higher values give more diffuse/scattered lighting. Value should be in the range 0-1. Lower values work better for deep oceans and higher values are better for shallow water.
IOR
The index of refraction, physical property that is 1.33 for water.
Max Refraction Rays
Limits the amount of refraction ray bounces. Only change this if you notice artifacts. Mostly useful if cycles is set to use a small number of bounces. Set it lower to remove black spots where there is a lot of internal reflection, 5 is usually sufficient. If it is too low, light will follow straight paths and not refract realistically. Setting it higher than the maximum amount of cycles light path bounces has no effect.
4. Vortex Foam
Vortex Foam takes in a shader of a fluid surface without foam. Mixed Shader is the input shader but with a foam shader mixed in. Alternatively, the Foam Factor output can be used as factor for mixing your own shaders with more control.
It has similarities to Vortex Flow. Particle Velocity and Particle Density can e connected the same way, see 2.2-2.5 for the different ways. Time can also be animated the same way.

Particle Velocity
See Particle Velocity in 2.5.
Particle Density
See Particle Density in 2.5.
Time
See Time in 2.5.
Animation Speed
See Wave Animation Speed in 2.5.
Crest Foam
The amount of foam that is formed in areas of high curvature, like on the crests of wave.
Acceleration Foam
The amount of foam that is formed in areas with large changes in velocity. Uses the Particle Velocity input.
Threshold
The lower threshold from which a part of the surface is considered foam. Increase this if the entire surface looks too white. Likely a small value near the range 0-0.1.
Noise Scale
The scale of the noise textures used to add extra variation to the foam.
Large Noise
The strenght of the noise determining what parts have foam and what parts do not. Increasing it above 1.0 gives sharper transitions between foam and water.
Fine Noise
The strength of the noise used to make the foam shader look more rough and textured. Has no influence on Foam Factor, only on the shader.
Density Blending
See Density Blending in 2.5
5. Reusing the internal flow mapping node
Vortex Flow is a lot more advanced than "regular" flow mapping, but it is still used internally in the shader. This node is automatically appended with Vortex Flow and can be used on its own. It can be used to make any type of texture flow, for instance colour but also specular, roughness etc. For an explanation of the flow mapping cycle, see this site. Connect it like this:
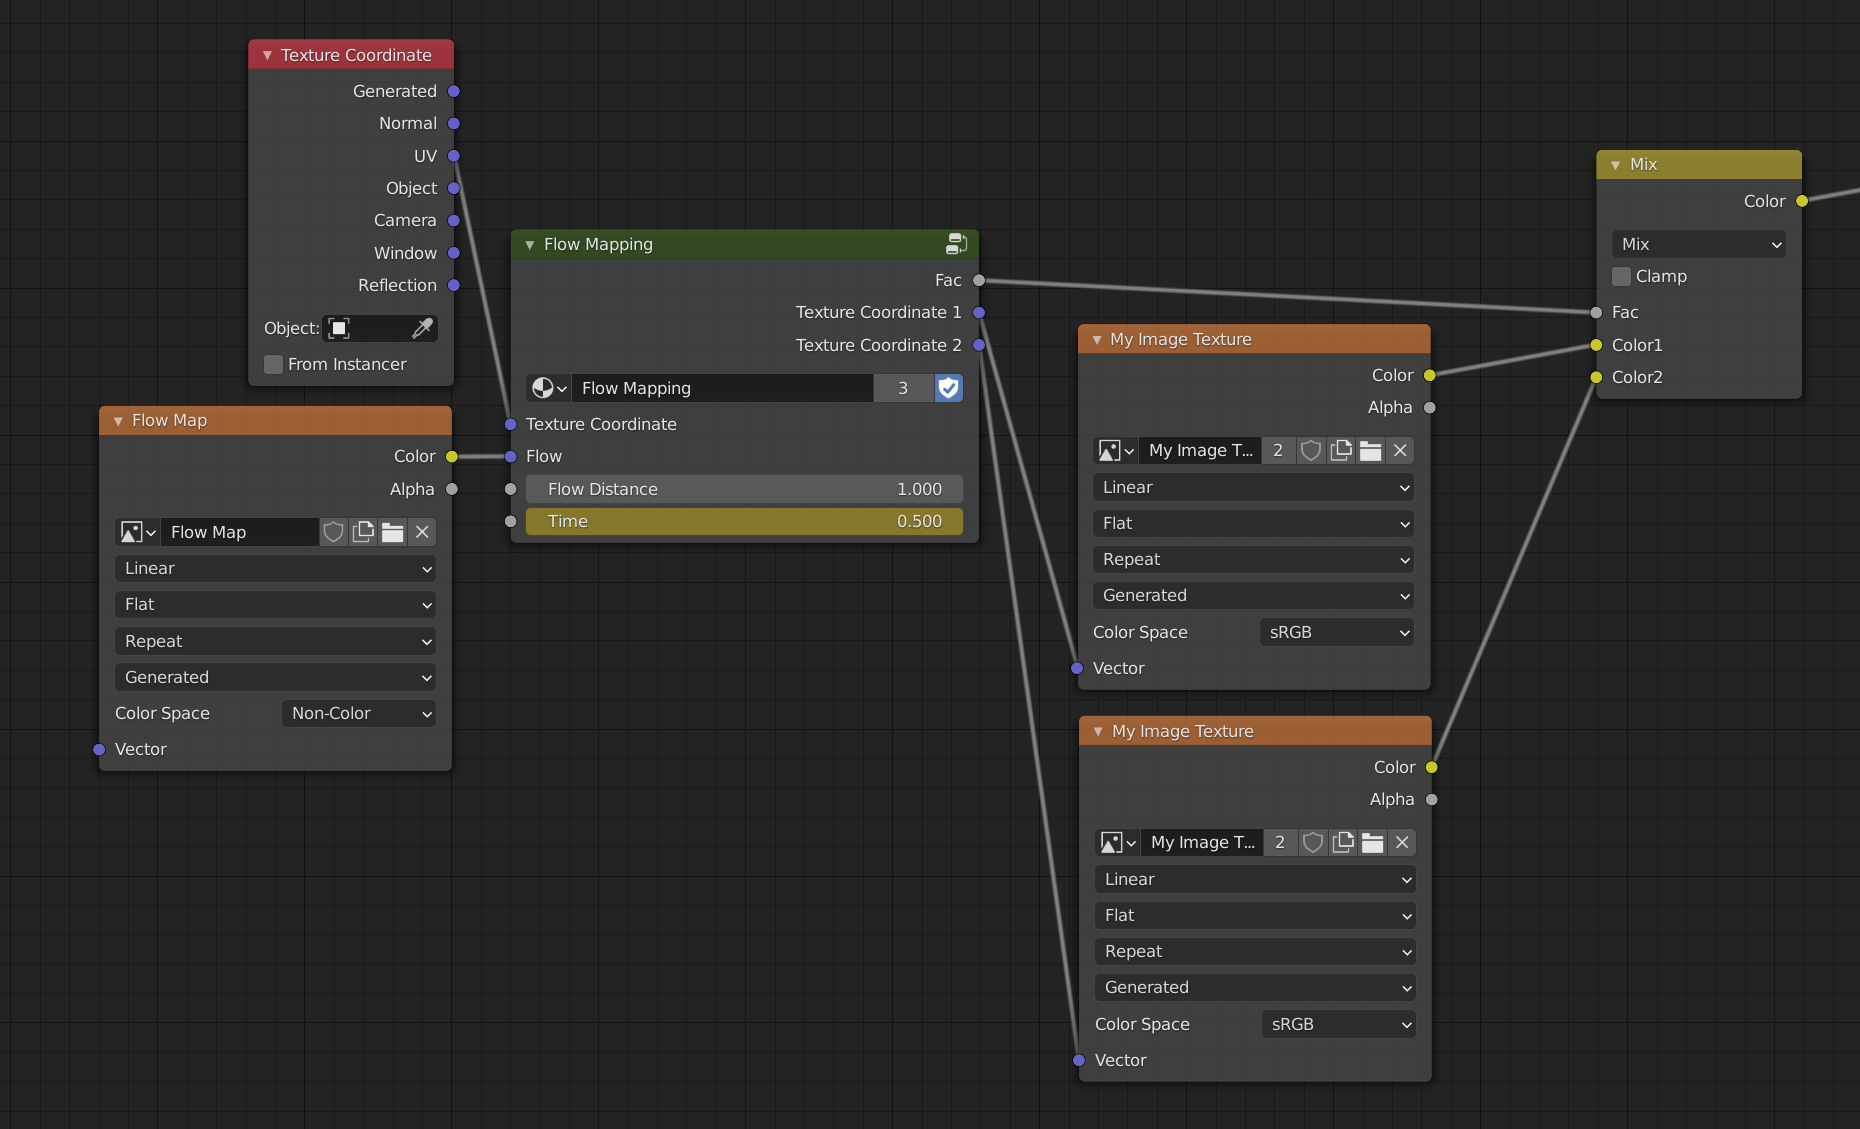
Both of the textures on the right need to be the same one.
Animate the Time value, the duration of one flow map cycle is exactly 1 time unit.
The Flow Distance is the total distance that the texture is translated/deformed before the cycle restarts. A different Texture Coordinate than UV works too.
Choose a product version:
| Sales | 600+ |
| Customer Ratings | 8 |
| Average Rating | |
| Dev Fund Contributor | |
| Published | about 3 years ago |
| Blender Version | 4.0, 3.6, 3.5, 3.4, 3.3, 3.2, 3.1, 3.0, 2.93, 2.92, 2.91, 2.9, 2.83, 2.82, 2.81, 2.8 |
| License | Royalty Free |
Have questions before purchasing?
Contact the Creator with your questions right now.
Login to Message